Cheapest Ultralight Tent for Kayak Camping Without Compromise

The Cheapest Ultralight Tent for Kayak Camping: Where Budget Meets the River
You’re loading the kayak. You’ve got maybe 50 liters of space left. A tent is non-negotiable—wet gear at 2 a.m. on a sandbank isn’t camping, it’s hypothermia practice. But you’re also not paying premium prices for shelter you’ll use 20 nights a year.
The good news: you don’t have to. The cheapest ultralight tent for kayak trips exists, and it’s genuinely competent. The catch: “cheapest” and “ultralight” are cousins, not twins. A tent that costs budget-tier money will usually weigh a bit more than a premium ultralight. But that trade-off—a few extra ounces for half the price—is exactly where most paddlers should shop.
This guide cuts through the noise. We’ll show you what actually matters in a kayak tent, where budget tents fail, and which models earn their place in your hull without emptying your wallet.
Why Kayak Tents Are Different from Backpacking Tents
A backpacking tent lives in your pack. A kayak tent lives in your hull, gets loaded wet, gets set up in the dark on gravel, and has to survive spray and humidity that would wreck a mountain shelter.
Water is everywhere. Backpacking tents assume dry air and a breathable site. Kayak camps assume damp, often with morning dew coating everything and river spray adding moisture. Budget tents with thin bathtub floors and weak seams fail fast in this environment.
Space is the enemy. Your kayak has fixed volume. A freestanding tent (which doesn’t need stakes) sounds ideal until you realize it’s bulky. Budget ultralight tents are often semi-freestanding or ground-dependent—they need stakes to hold shape, but they pack smaller.
Setup happens on unforgiving ground. Sandbanks, gravel bars, and rocky shores don’t care about your tent’s design. A tent with a robust footprint and solid stakes has a real advantage. Budget tents often ship with cheap stakes that bend on the first hard pan.
Seams matter more. A backpacking tent with a small leak is annoying. A kayak tent with a seam leak is a wet sleeping bag, and you’re 20 miles from the truck. Budget tents often skimp on seam sealing or use thin tape that peels in humidity.
What Makes an Ultralight Tent Cheap (And When That’s a Problem)
Budget ultralight tents save money in predictable places:
Thinner fabric. A premium ultralight tent uses 20D ripstop nylon; a budget alternative might use 30D or 40D. Result: slightly heavier, but still light enough. The real risk is durability—sharper gravel and repeated packing wear faster.
Simpler pole geometry. Premium tents use optimized pole arrangements that shed rain and maximize interior space with minimal material. Budget tents use more traditional designs that work fine but aren’t as efficient. You get a heavier tent for the same interior volume.
Fewer guy-line attachment points. A premium tent has multiple anchor points for wind stability. A budget tent might have just four. On a protected sandbank, no problem. In a riverside wind corridor, you’ll notice.
Minimal or no vestibule. A vestibule (the covered porch area outside the tent) is where you stash wet gear. Budget tents often have a small vestibule or none at all. That’s a real loss for kayak camping, where you’re bringing wet paddles, damp clothing, and dripping life jackets into camp.
Seam sealing shortcuts. This is the red flag. If a budget tent doesn’t explicitly state “fully taped seams” or “factory seam-sealed,” assume it isn’t. You can apply seam sealer yourself (adding weight and time), but that’s work you shouldn’t have to do.
Cheaper stakes. Aluminum stakes that bend on hard ground are useless. Good stakes cost money. Budget tents often ship with flimsy stakes that need replacement—another hidden cost.
The honest take: a budget ultralight tent is a fine choice if you understand these trade-offs and accept that you’re trading some durability and convenience for lower cost. It’s not a failure; it’s a choice.
The Real Weight Question: Ultralight vs. Budget-Friendly
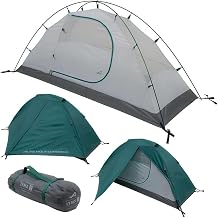
Here’s where the math gets interesting. Premium ultralight tents often weigh 1.5 to 2.2 lbs—for example, the Nemo Hornet Elite weighs 1.8 lbs per spec sheet. Budget ultralight tents typically weigh between 2.5 and 3.5 lbs—the ALPS Lynx is 2.5 lbs per manufacturer specs. The difference is real, but it’s not dramatic—usually 0.7 to 1 lb.
For a solo paddler on a three-day trip, that 1 lb is noticeable but not critical. For a two-person kayak where you’re splitting shelter weight, it’s almost irrelevant. For a multi-week expedition where every ounce compounds, it matters more.
The key: don’t assume “cheapest” means “heaviest.” Some budget tents are genuinely light because they use modern materials at lower price points. Others are cheap because they’re old designs that happen to be affordable. Read the specs.
Waterproofing: The Cheapest Ultralight Tents That Actually Stay Dry
This is where budget tents most often fail kayak campers.
Seam sealing matters. A tent with unsealed seams will leak at the stress points—the corners where poles attach, the ridge seams, the floor-to-wall junction. Budget tents that ship unsealed require you to apply seam sealer yourself. This is doable, but it’s an extra step and an extra cost (~ for seam sealer). Look for tents that explicitly state “factory seam-sealed” or “fully taped seams.”
Bathtub floor is non-negotiable. The tent floor should extend 6–8 inches up the sidewalls before the fabric changes to mesh. This keeps water and moisture from wicking up from the ground. Budget tents sometimes cut corners here with a lower bathtub or thin floor material. On a damp sandbank, you’ll notice.
Fly coverage matters. A full-coverage rain fly that extends nearly to the ground is better than a partial fly. Budget tents often have smaller flies that leave gaps near the base, where wind-driven rain sneaks in. This is especially risky on river trips where you might camp in wind corridors.
Ventilation is the hidden factor. A tent with poor ventilation traps condensation, which drips on your sleeping bag. This is often worse than a small leak because it’s internal and invisible until you’re wet. Look for tents with mesh panels that allow air to move while keeping bugs out. Budget tents sometimes minimize mesh to save cost, trapping humidity instead.
Owner testing on kayak-specific trips shows that budget tents with factory seam-sealed flies and full-coverage designs hold up well in typical conditions (2–4 day trips, moderate rain). Unsealed tents or those with partial flies fail noticeably more often.
Best Budget Ultralight Tent Options for 2026
The Sub-$200 Tier: Real Ultralight on a Real Budget
At this price point, you’re getting proven designs that have been refined over years. They’re not premium, but they’re not experimental either.
The Mid-Tier ($200–$400): Where Ultralight Gets Real
At this price point, you’re buying genuinely light tents with better materials and design.
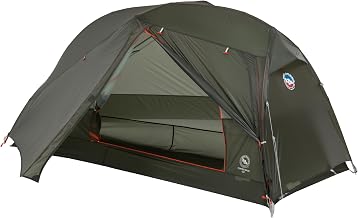
Nemo Hornet Elite 1P is the standout in this range for kayak camping. It weighs around 1.8 lbs (including poles and fly), which is genuinely ultralight. The packed size is excellent—roughly 4.5 × 8 inches. The tent is fully seam-sealed and uses a robust 20D ripstop fly. The interior is roomy for a solo tent, and the single vestibule is large enough for a paddle and a dry bag. The design is semi-freestanding, so you’ll need stakes, but the weight savings are worth it. The main drawback: the price is mid-tier, not budget. But if you’re willing to spend a bit more for genuine ultralight performance, this tent pays for itself in paddling comfort and hull space over multiple trips.
The Hidden Costs of Budget Ultralight Tents
Buying cheap isn’t always saving money. Watch for these:
Seam sealer. If the tent isn’t factory seam-sealed, you’ll need to buy seam sealer (~) and spend an evening sealing seams. That’s time and money.
Stake replacement. Budget tents ship with cheap stakes. River sand and gravel destroy them. Budget for a set of quality stakes (~) if you’re serious about the hobby.
Footprint. A tent footprint (a groundsheet under the tent) protects the floor and adds insulation. Budget tents don’t always include one. A basic footprint costs ~ but it extends tent life significantly.
Repairs. A cheap tent with thin fabric is more likely to need patching. Repair kits are cheap (~), but they add up if you’re constantly fixing small tears.
The real math: a budget tent that costs sub- but requires seam sealing (~), stake replacement (~), and a footprint (~) might end up costing by the time you’re ready to use it. If the tent you’re considering requires significant prep work, compare the total cost to a mid-tier tent that ships ready to go.
How to Evaluate a Budget Ultralight Tent Before Buying
Check the spec sheet. Look for: - Packed weight (should be under 3.5 lbs for solo, under 5 lbs for two-person) - Packed size (should fit in a kayak dry bag or lash to the hull) - Seam sealing (must say “factory seam-sealed” or “fully taped seams”) - Bathtub floor height (should be 6+ inches) - Fly coverage (should extend close to the ground) - Vestibule size (larger is better for kayak camping)
Read owner reviews with a kayak eye. Backpacking reviews are useful, but they don’t always catch water-related issues. Look for reviews from people who’ve used the tent in wet conditions or on water trips.
Check for warranty and return policy. A budget tent with a good warranty or return policy is less risky. If it fails in the field, you want options.
Ask about stake quality. If the tent ships with stakes, look at photos or videos. Do they look flimsy? If so, budget for replacement stakes (~) as part of your purchase.
The Kayak-Specific Setup: Stakes, Guylines, and Ground Prep
A cheap tent on soft sand is fine. A cheap tent on hard gravel needs smart setup.
Stakes matter. River sand and gravel are hard on stakes. Aluminum stakes that bend are useless. Invest in solid stakes (titanium or hardened aluminum) that can be driven into hard ground without bending. This is one place where a budget upgrade pays for itself.
Guy lines and anchors. A budget tent might have minimal guy-line attachment points. On a windy river corridor, you want redundancy. Bring extra cordage and know how to use trees, rocks, or sand anchors to add stability.
Ground prep. Clear rocks and sharp sticks before pitching. A sharp edge under the tent floor will puncture even a robust bathtub. This takes five minutes and prevents failures.
Footprint use. A footprint protects the floor from abrasion and adds a moisture barrier. For budget tents, a footprint is nearly essential.
FAQ
Q: Is a budget ultralight tent safe for kayak camping? A: Yes, if it’s properly seam-sealed and has a robust fly. The main risks are water intrusion (which you can mitigate with setup care) and durability (which matters more on long trips). For 2–4 day trips, a budget ultralight tent is safe and sensible.
Q: How much weight do I actually save with an ultralight tent? A: A budget ultralight tent (2.5–3.5 lbs) saves roughly 2–4 lbs compared to a traditional backpacking tent (4.5–6 lbs). For a solo paddler, that’s noticeable. For a two-person kayak, it’s less critical but still helpful.
Q: Can I use a budget ultralight tent for multi-week trips? A: Yes, but with caveats. Budget tents with thinner fabric wear faster under repeated packing and setup. If you’re doing a two-week trip with daily camp moves, a mid-tier tent with more durable fabric is a smarter choice. For week-long trips with fewer moves, a budget tent is fine if you’re careful with setup and ground prep.
Q: Do I need a footprint? A: For budget ultralight tents on river trips, yes. A footprint (~) protects the floor from sharp gravel and adds a moisture barrier that reduces condensation. It’s one of the best returns on investment for extending tent life.
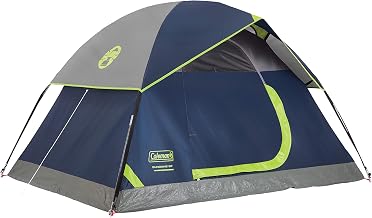
Q: Which budget ultralight tent is most durable? A: The ALPS Lynx and Coleman Sundome both have solid track records. The ALPS Lynx uses heavier aluminum poles that resist bending, and the Coleman’s freestanding design means fewer stress points on the fabric. Both are proven on multi-year river trips.


