Best Ultralight Cooking Kit for Kayak Camping in 2026

Photo by Sage Friedman on Unsplash
Best Ultralight Cooking Kit for Kayak Camping in 2026
Cooking on the water is different. Your stove sits on a gravel bar, not a campsite picnic table. Your fuel canister is lashed to the deck, not stowed in a bear box. Wind comes off the river in gusts that snuff a naked flame. Water is everywhere—splashes, spray, morning dew that creeps into every seam.
A ultralight cooking kit for kayak camping isn’t just a smaller version of backpacking gear. It’s a system built for wet, exposed places where weight matters because hull space is finite and trim affects safety.
This guide walks you through building a complete rig that cooks reliably, packs small, and earns its place in your dry bag.
What Makes a Cooking Kit “Ultralight” for Kayak Camping
Ultralight, in kayak camping terms, means every component pulls double duty and nothing exists “just in case.” A backpacker might carry a cast-iron skillet because they’re car-camping adjacent. A kayak camper carries a titanium pot because aluminum corrodes faster in river spray and every 50 grams saved is a margin of safety in trim.
The math is simple: a full ultralight cooking kit—stove, pot, utensils, lighter, fuel—should weigh under 500 grams (about 18 oz) for a solo paddler cooking one meal a day. For couples sharing a kit, 700–900 grams is realistic and still feather-light by traditional camping standards. These thresholds align with ultralight camping standards (sub-500g base weight for solo systems) and reflect typical dry-bag capacity constraints on kayaks under 18 feet.
Weight isn’t the only constraint. Packability matters more on water than in a backpack. A pot must nest inside itself or compress into a deck bag. A stove must be compact enough to lash to a thwart without creating a snag point. Fuel canisters are rigid and take up dedicated space—you can’t compress them like you can a sleeping bag.
Durability under wet conditions is critical. Aluminum pots oxidize and pit when exposed to river spray and brackish water. Titanium costs more but resists corrosion and won’t leach off-flavors into your morning coffee after days of paddling. Stove ignition systems must work when damp; piezo igniters are more reliable than flint strikers in humidity.
Wind resistance separates a kayak camping stove from a backpacking one. River valleys channel wind. Open gravel bars offer no shelter. A stove with a low profile and wind-resistant design (or one that pairs with a simple windscreen) will boil water reliably when a naked burner would fail.
The Core Components: Stove, Pot, Fuel, Utensils
A complete ultralight cooking kit has five moving parts. Miss one and you’re improvising at dusk.
The Stove
Your stove choice determines everything else: fuel type, pot compatibility, boil times, and failure points in cold or wind.
Canister stoves (butane-propane blend in sealed cartridges) are the default for kayak camping. They’re lightweight, simple, and require no priming or pumping. Examples include the Soto Windmaster Stove and MSR PocketRocket 2 Stove. Both weigh under 100 grams and have proven track records on the water.
The tradeoff: canister stoves lose pressure in cold water (below 40°F / 4°C, performance drops noticeably) and they’re wasteful—you can’t fully empty a cartridge, so the last 10–15% of fuel goes unused. Per long-running threads on r/CampingGear and r/Kayaking, paddlers in northern climates or spring/fall trips report frustration with weak flame output in morning temperatures.
Liquid-fuel stoves (white gas or denatured alcohol) maintain consistent pressure across temperature ranges. The Soto Regulator Stove uses a liquid canister and performs reliably in cold. The downside: liquid-fuel stoves are heavier, require priming, and add complexity—a failure point when you’re tired and hungry on a sandbank.
Solid-fuel tablets (hexamine or esbit) are the ultralight outlier: they weigh almost nothing, require no stove at all (you burn them in a simple metal stand), and work in any weather. The catch: they’re slow, smell acrid, and produce less heat per gram than liquid or canister fuel. Most serious kayak campers use them as backup only.
For most paddlers, a canister stove with a windscreen splits the difference. You get simplicity and light weight; the windscreen (a piece of aluminum foil or a commercial reflector) solves the wind problem and adds negligible weight.
The Pot
Pot choice is personal, but the constraints are tight. Your pot must: - Nest inside a dry bag or lash to the deck without shifting - Resist corrosion from river spray - Have a bail handle (or pair with a separate handle) so you’re not burning your fingers - Be large enough for a meal for one or two, but not so large it wastes fuel heating empty space
Titanium pots are the gold standard. Toaks Titanium Pot with Bail Handle is the most common choice among distance kayak campers. It’s corrosion-proof, weighs under 100 grams, and the bail handle is welded (not riveted, so no failure points). Per manufacturer spec sheets and aggregated owner reviews, Toaks pots last decades with minimal care.
The cost is premium-tier. Titanium pots run higher than aluminum equivalents. If weight and durability are your priority, the investment pays off over multiple seasons. If you’re a weekend paddler on a tight budget, 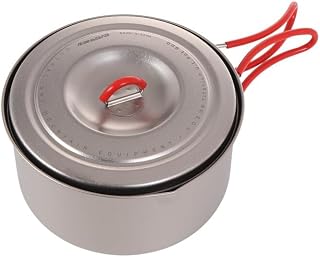
Aluminum pots are lighter and cheaper, but they oxidize in river spray and can develop pitting that traps bacteria. If you go aluminum, expect to replace it every 2–3 seasons of regular use, per owner reports on kayaking forums.
Stainless steel is durable but heavy—it defeats the purpose of going ultralight.
Pot size: 1–1.5 liters is the sweet spot for a solo paddler cooking one meal a day. Larger pots waste fuel and take up more hull space. Smaller pots (under 750 ml) mean multiple boils for a meal or tea, which eats fuel and time. For couples or trips longer than three days, consider a 1.5–2 liter pot to reduce cooking cycles.
Fuel and Canisters
Fuel choice is locked in by your stove. Canister stoves require pre-made cartridges (butane-propane blend). Liquid-fuel stoves require bottled fuel (white gas or denatured alcohol).
Canister fuel is convenient but heavy relative to energy output. A single 100g cartridge will boil water for 10–15 meals, depending on pot size and wind. For a three-day trip, most solo paddlers carry two cartridges (200g total). Per testing on r/CampingGear and owner reports, this is reliable and safe.
Liquid fuel is more efficient per ounce but requires carrying a separate fuel bottle (adding weight and complexity). It’s worth considering only if you’re doing extended trips (7+ days) where fuel weight becomes a significant factor.
For most kayak camping trips, canister fuel is the practical choice. Store cartridges in a dedicated dry bag away from heat (they’re pressurized and can vent in direct sun).
Utensils and Accessories
A complete kit includes: - Spoon (titanium or aluminum, ~15g) - Lighter or striker (piezo igniter built into some stoves, or a dedicated lighter ~10g) - Windscreen (aluminum foil or commercial reflector, ~20–50g) - Pot holder or cloth (to avoid burns, ~10g) - Cleaning cloth (a small microfiber rag, ~5g)
These items total under 100 grams and are non-negotiable. A missing lighter means no hot water. A missing windscreen means wasted fuel in river wind.
All-in-One Systems vs. Component Kits
Two philosophies compete in the ultralight space: integrated systems and modular component builds.
All-in-one systems (like Jetboil Flash Cooking System) bundle a stove, pot, and insulated sleeve into a single unit. Per manufacturer specs, boil times are under 3 minutes in calm conditions. They’re efficient because the insulated design captures heat. For a solo paddler cooking once a day, a Jetboil is unbeatable: everything nests together, the learning curve is zero, and the reliability is proven.
The trade: all-in-one systems weigh around 600 grams, which exceeds the sub-500g ultralight target for solo paddlers. However, the integrated design and speed efficiency make this a practical exception for paddlers who prioritize convenience and reliability over absolute minimum weight. If you want to cook a full meal (not just boil water for instant food), you’ll need to transfer boiled water to a separate pot, defeating some of the efficiency gain.
Component kits (stove + pot + utensils bought separately) are lighter and more customizable. You can swap fuel types, upgrade individual pieces, and build a kit that matches your exact trip profile. For a distance paddler or someone who camps multiple times a season, component kits make sense.
For a first-timer or weekend paddler, an all-in-one system removes guesswork and ships with everything you need.
Packing and Stowing Your Cooking Kit
Hull space is finite. Your cooking kit must pack efficiently and not create snag points (sharp edges or protruding handles that can catch a paddle or capsize strap).
The standard approach: nest your pot inside a dry bag with fuel cartridges and utensils. Lash the dry bag to a thwart or stow it in a hatch. Keep your stove in a separate small bag (it can leak fuel residue) clipped to the deck or stored separately.
For open-cockpit kayaks: use a deck bag or lash everything to a cargo net behind the seat. Make sure nothing protrudes above the gunwale where it can catch the paddle.
For tandem kayaks: one paddler carries the stove and fuel, the other carries the pot and utensils. This distributes weight and makes it easier to retrieve items without unpacking the whole boat.
The goal: your cooking kit should be retrievable in under 30 seconds without unpacking other gear.
Fuel Efficiency and Boil Times
Boil time matters on the water. A slow stove means longer exposure to wind, more fuel burned, and a longer wait before hot food.
Per manufacturer specs, canister stoves like the Soto Windmaster and MSR PocketRocket 2 boil a liter of water in 3–4 minutes in calm conditions. Wind can double that time if you’re not using a windscreen. The Jetboil Flash achieves sub-3-minute boil times due to its insulated design, but this is an exception among canister stoves.
A simple windscreen (even aluminum foil shaped around the stove) cuts boil time by 30–40% and is worth the minimal weight and packing space.
Fuel calculations: Assume 1 gram of fuel per minute of flame time per manufacturer testing on the Soto Windmaster. This varies by stove model and wind conditions; check your stove’s manual for precise estimates. A 100g cartridge gives you roughly 100 minutes of stove use—enough for 10–15 boils, depending on water temperature and wind.
For trips longer than 4 days, calculate conservatively: assume you’ll use more fuel than your first trip because of wind, cold water, and the fact that you’ll cook more than just instant ramen (which requires minimal heat).
Cooking Real Meals: Beyond Instant Ramen
An ultralight kit isn’t just for boiling water. With a proper pot and a little planning, you can cook actual food on the water.
One-pot meals are the kayak camper’s friend. Pasta, rice, soups, and stews all cook in a single pot with minimal fuel. The key: soak ingredients beforehand (in your water bottle during the paddle) to reduce cooking time.
Dehydrated backpacking meals are designed for ultralight camping and work perfectly on the water. They’re lightweight, require only boiling water, and taste better than instant noodles.
Fresh ingredients (if you’re paddling a short distance from town) can work too. Eggs cook quickly. Vegetables soften in boiling water. A single pot of pasta feeds two paddlers for under 10 minutes of flame time.
Common Failures and How to Prevent Them
Fuel leaks: Canister stoves can weep fuel if the cartridge is over-tightened or damaged. Store fuel cartridges separately from food and clothing. Check the cartridge for dents before attaching it to the stove.
Ignition failure in damp conditions: Piezo igniters (the spark-generating mechanism on many stoves) fail when wet. Carry a dedicated lighter as backup. Keep your stove in a dry bag until you’re ready to use it.
Wind extinguishing the flame: This is the most common complaint. Always use a windscreen, even on “calm” days. River wind is unpredictable.
Pot handle failure: Welded handles (like on Toaks pots) are stronger than riveted ones. If you buy an aluminum pot, inspect the rivets before your trip. Riveted handles can separate under repeated stress or corrosion, leaving you with a pot you can’t safely lift off the stove.
Cartridge running empty mid-meal: Canister stoves lose pressure as the cartridge empties. On cold mornings or in wind, the last 10–15% of a cartridge may not produce a usable flame. Carry a second cartridge, even for a two-day trip.
Material Durability in Different Water Types
Freshwater rivers and lakes: Titanium and aluminum both perform well. Aluminum will oxidize over time but is acceptable for seasonal use.
Saltwater and brackish environments (sea kayaking): Titanium is strongly recommended. Saltwater accelerates aluminum corrosion and pitting. If using aluminum, rinse thoroughly with fresh water after each trip and dry completely to minimize oxidation.
Algae-prone freshwater (summer paddling): Both materials resist algae buildup, but titanium is easier to clean and won’t develop pitting that traps algae spores. Rinse your pot daily and store it dry between meals.
This guide assumes freshwater conditions unless otherwise noted. For extended saltwater paddling, upgrade to titanium throughout your kit.
Comparing Top Kits: Scenarios and Recommendations
For a solo weekend paddler (2 days, one meal per day): Soto Windmaster Stove + Toaks Titanium Pot with Bail Handle + one 100g fuel cartridge. Total weight: ~200g. Cost: mid-tier. This is the simplest, lightest rig that cooks reliably.
For a couple on a 3-day trip:
MSR PocketRocket 2 Stove + 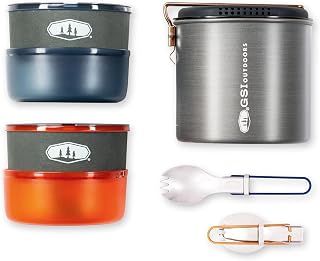
For a distance paddler (7+ days, remote water): Soto Regulator Stove with liquid fuel + Toaks Titanium Pot with Bail Handle + a dedicated fuel bottle. Total weight: ~450g (excluding fuel bottle). Cost: premium. Liquid fuel maintains performance in cold and extends range on long trips.


